How to improve Largest Contentful Paint
This article assumes a base level of knowledge about Core Web Vitals and how to audit them. To revisit this topic, please check out the first article in this series: What are Core Web Vitals?
We previously highlighted that LCP stands for “Largest Contentful Paint” and delved into ways one might begin auditing for issues. This article will take that a step further by discussing how we might audit LCP specifically, some things to look out for, and what to do with some of the recommendations Google puts forth.
Identifying LCP problems
As with all Core Web Vital issues, our first signifier for LCP issues should be one of two things:
- The Core Web Vitals report in Google Search Console highlights pages with LCP issues
- The PageSpeed Insights shows a high percentage of LCP issues experienced within the last 28 days
Once we know there is an issue with LCP, we need to test pages to help identify the issues. If we’re using Google Search Console as an indication of issues, this should be relatively simple, since it will highlight a number of sample pages for each subfolder experiencing high LCP.
Using PageSpeed Insights to identify problem pages can be a bit trickier, since you can only view data for the page tested or for the full origin. However, if you have suspicions about a specific page, PageSpeed Insights can be great for spot testing.
The first thing we need to do when testing LCP is to run our page through Google’s Lighthouse Audit. This will help us to identify what Google sees as the largest element of the page.
However, just because Google sees an element as the largest during Lighthouse testing doesn’t mean that’s what users see or what Google is attributing to your Core Web Vitals report. The Core Web Vitals report is based on user data from the ChromeUX report, so we can only treat the Lighthouse report as a simulation.
Google Lighthouse will also throw out some recommendations of things you could change to improve LCP. There’s a chance these won’t all be possible to implement, and we should approach LCP from the perspective of “which issue will give the biggest reward for the lowest cost”. So let’s break some of these recommendations down.
Pagespeed insights recommendations
Render-Blocking Resources & Asynchronous loading
Render-blocking resources are page resources, such as CSS or JavaScript files, which are processed on the main thread during the initial page load (before LCP is reached). Since the main thread can only process one thing at a time, more things using the main thread early in the load will result in a longer time to reach LCP.
CSS
For non-critical render-blocking CSS resources, Google offers a slightly different approach, utilising a preload link in the <head> of the document. This allows us to instruct the browser to download and cache a resource as soon as possible, making it available for when the browser needs to process the CSS, reducing the necessity for the main thread to pause and wait for downloads.
Please note, the below code snippets are taken from the Google example.
We can implement the preload link for CSS resources by adding the following line to the <head>:
<link rel="preload" href="example.css" as="style">
However, because preload is a mandatory directive, a browser will be forced to follow it. Most browsers are good at prioritising preloads based on resource type. However, we can further mitigate any potential issues by using the onload attribute. E.g.:
<link rel="preload" href="example.css" as="style" onload="this.onload=null;this.rel='stylesheet'">
Since onload is a JavaScript event, we have now introduced a JavaScript dependency to our resource management. We therefore need a fallback for instances where JavaScript is unavailable to the browser. We can do this with the <noscript> element, which will be ignored by browsers that can execute JavaScript. E.g.:
<link rel="preload" href="example.css" as="style" onload="this.onload=null;this.rel='stylesheet'">
<noscript><link rel="stylesheet" href="example.css"></noscript>
To ensure this is effective, the line should be added as high up in the <head> as possible.
JavaScript
Google’s answer to this issue for non-critical JavaScript resources is to use asynchronous loading. This is where we tell the browser to de-prioritise certain resources to allow the main thread to focus on processes crucial to rendering, allowing us to hit LCP sooner. To do this, we can use either the async or defer tags — both of which have the same outcome but operate slightly differently.
The async tag will allow a JavaScript resource to be downloaded asynchronously. However, it will be parsed and executed as soon as the download is complete. This means that, once downloaded, the resource could still take up the main thread at times when more critical processes should be utilising it. Conversely, the defer tag allows a JavaScript resource to be downloaded asynchronously but not be executed until all other document parsing is completed.
We can implement async and defer tags by amending the <script> reference to read the either of following, respective to which tag is in use:
<script async src="example.js"><script defer src="example.js">
But what if our JavaScript is critical to the page load? Google recommends inlining all critical JavaScript to ensure the browser can process it as soon as possible without waiting on a download.
The Issue with Inlining
So this all sounds pretty clear-cut, right? Well, it’s not always quite so simple. Inlining scripts and CSS can come with a few of its issues. For example, inlined resources cannot be cached, so while this solution would make first-visits quicker, it would have minimal impact on return users.
Additionally, inlining JavaScript or CSS can mean more work for the web developer. Devs will often use global resources like JavaScript or CSS files to ensure maintenance can be restricted to a single change in a single resource. However, if we have inlined scripts and CSS across multiple templates, this will likely require the developers to alter each individual template each time they want to make a change, leading to cost and consistency issues. It will be possible to alter how templates are generated for some sites, allowing for inline JavaScript to be updated in a modular fashion. However, this in itself would likely be a large undertaking.
A happier middleground is to identify the resources which can be loaded asynchronously, and to only apply changes to the way these are loaded, leaving critical resources in global files as they are.
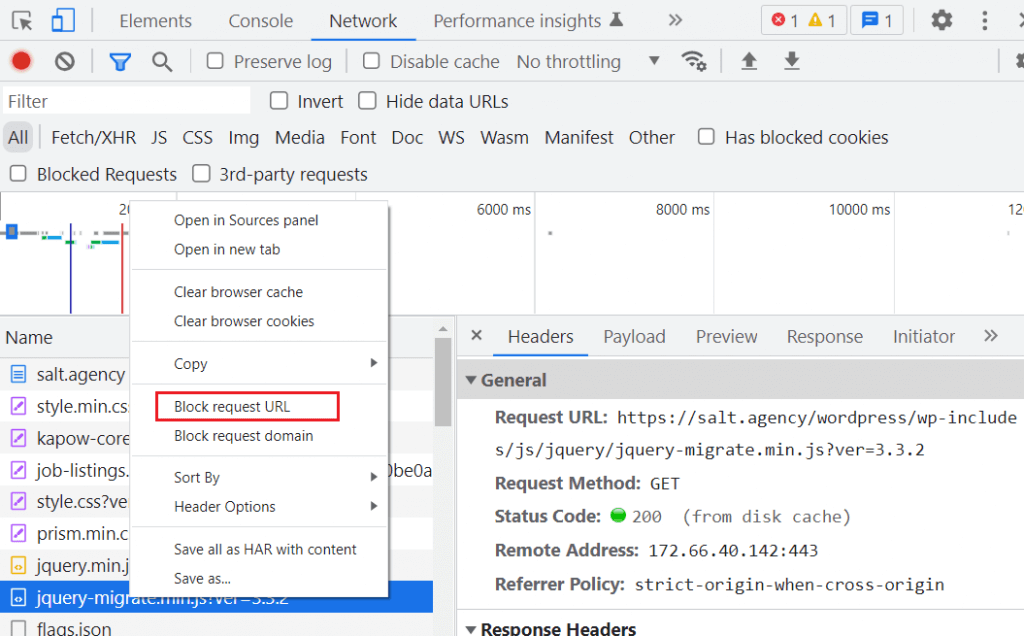
One great way to test whether a script can be loaded asynchronously is to block it from loading with Chrome DevTools.
To do this, open Chrome DevTools and head to the Network tab. Identify the script in question, right click and select “Block request URL”, then reload the page. This will then give you an idea of how the page looks without that script.
We should always be sure to check with developers as to the functionality of certain scripts since the in-browser testing may not be conclusive. For example, in instances where A/B testing is used, we may have scripts such as Google Optimize to ensure there are no layout shifts during the initial load of the page. In such instances, we would not be able to asynchronously load Google Optimize.
It is unlikely a site will ever be able to tick off all render-blocking resources without significant (and costly) infrastructure changes. Unless a site would find it very easy to make these changes, improvements should be a balancing act between what is easily implementable and what will have the largest impact (i.e. the big scripts which can be deprioritised and loaded asynchronously).
Preload, preconnect, and prefetch
When we talk about preloading, there are four link tags to be aware of:
- <preload>
- <preconnect>
- <dns-prefetch>
- <prefetch>
Preload
The preload attribute tells a browser that we will need a specific resource soon and that it should start downloading it when possible. It should be used when we know a critical resource is only going to be discovered later in the loading time. Additionally we can tell the browser what the resource is using the as attribute. This helps the browser prioritise according to resource type.
However, preload is a mandatory directive to a browser, and preloading a large amount of unnecessary scripts will impact CPU resources, resulting in slower page load. We should only use preload for critical resources such as JavaScript and CSS that we know will be required later in the page load.
An example of the preload attribute can be seen below.
<link rel=”preload”>
Preconnect
The preconnect attribute is used to tell a browser to open a connection with another domain or subdomain —referenced in a link tag. This gets all pre-TTFB things (such as DNS lookup, connection time, and the TLS handshake) out of the way before a resource from that location is needed, and will keep the connection to that subdomain open for a period of time. This means that when the browser reaches a resource on that subdomain it won’t need to go through these steps again. The period of time a connection will stay open is configurable in the web server config and communicated via the keep-alive HTTP header response. However, if a browser does not receive a directive via keep-alive, it will sever the connection after 10 seconds.
An example of the preconnect attribute can be seen below.
<link rel=”preconnect”>
It’s great to use preconnect for domains and subdomains hosting resources we’re likely to use within 10 seconds of page load. However, we should be aware that opening a large number of connections will use more CPU resources (potentially slowing page load). Therefore, we should only preconnect to important domains and subdomains that will be accessed within 10 seconds.
Savings from a preconnect can vary, depending on how many domains and subdomains our resources are hosted on and how much CPU resource we need to use to open all required connections.
DNS Prefetch
The dns-prefetch attribute gets part of the TTFB process out of the way (notably the DNS lookup) but does not fully open a connection with the server. It should be used for domains and subdomains hosting non-critical page resources that are very likely to be required.
An example of the dns-prefetch attribute can be seen below.
<link rel=”dns-prefetch”>
Savings from using a dns-prefetch are dependent on how many domains and subdomains non-critical resources are hosted on.
Resource-specific prefetch
The prefetch attribute is used to tell a browser to fetch and cache a resource in the background so it is ready when we need it. It should be used for individual non-critical page resources that are very likely to be required at some point.
An example of the prefetch attribute can be seen below.
<link rel=”prefetch”>
Savings from a prefetch are dependent on browser cache settings.
Lazy load images
Lazy loading is the method of telling a browser to delay the download of a page resource that is not required for the initial above-the-fold paint. It is great to use for below-the-fold images, since these will not be part of the Largest Contentful Paint.
There are several legacy methods for lazy loading, most of which include using JavaScript. However, the preferable method for lazy loading is to use the browser level loading=”lazy” image tag attribute. This can be applied to all images, and the browser will calculate whether or not they are below the fold — this also works with responsive web design, where image positions may be dependent on viewport dimensions.
Technically, implementing lazy loading on an above-the-fold image will force the browser to calculate whether or not the image is above the fold, increasing load times very slightly for that image. For perfect lazy-load optimization, we should only apply lazy loading to images below-the-fold. However, the savings from this would be minute and may not be worth the development time.
Most web platforms allow the usage of the browser level lazy loading attribute and on some platforms, such as WordPress, it may be implemented on images by default.
WordPress troubleshooting tip: if you are using WordPress (post 5.5) and don’t see lazy-loading, check your plugins, since they can interfere.
Browser level lazy loading is a great way to optimise LCP and should always be investigated as a possibility. It should be relatively easy to implement en-masse in most instances. However, if it does look like it will take significant development resources to implement, consideration should be given as to the potential speed savings vs the development cost.
Images in next-gen formats
Images can often have a large, negative, impact on page load times due to the size of the resource. By reducing the image size (in terms of bytes to download), we can improve the time it takes a browser to download and process them. However, images can start to look noticeably worse as we reduce the resolution.
One way to reduce image size without compromising the visual quality is to convert the image to a new-gen image format with more efficient compression than legacy formats, such as WebP (Google’s favoured new-gen format).
Because of its superior compression, WebP allows images to have higher visual quality at a lower byte size, in comparison to its legacy counterparts.
However, the difficulty of next-gen image implementation often depends strongly on the platform in use and number of legacy formatted images already in use. Some platforms, such as WordPress, will have plugins available to convert images into the WebP format, meaning that you can enjoy the benefit with little development cost. However, not all plugins are free, so there may still be an implementation cost in the form of plugin payment.
When deciding whether to convert images in legacy formats to WebP, we should first review the impact of our images and whether they are even included within the LCP score. For example, if there are a significant number of below-the-fold images, we can mitigate their impact via lazy-loading.
If we decide to convert some images but not all, we could look to convert only the hero images, which we know are likely to be above-the-fold, while ignoring images which will be lazy-loaded.
Conclusion
So which of the above do we need to do? The answer is truly an SEO “it depends”. However, we should aim to do as many of the above as we reasonably can to move the needle as much as possible, without exerting too much effort or expense.
It’s crucial to confer with developers when working on LCP, as the majority of Google’s recommendations are generic, and implementation approach or difficulty will often be platform-dependent.
The important thing to remember is that you don’t need to tick every single box to improve LCP. We should typically start with the easiest to implement, moving on to the more difficult implementations if the page has not improved enough to benefit from the Core Web Vitals ranking boost.


