Custom Extraction Using Sitebulb & Screaming Frog
For a while now, I have been using custom extraction to perform routine technical SEO tasks.
Some of the examples I have used it for, include finding keywords for internal linking opportunities, identifying the number of products within a category and identifying tags across a website.
For this, my go-to method is typically using XPath in Screaming Frog via the custom extraction feature.
Once you have a custom extraction rule written for Screaming Frog, it is incredibly reliable. However, using the same extraction rule from site-to-site doesn’t translate well in some instances, mainly as sites vary in how they are built.
However, since Sitebulb v4.0 was released, there is now the option to perform custom extractions that are incredibly easy to automate, even if you have little to no knowledge of XPath, CSSPath or Regex.
In this post, I will show you how to use both Screaming Frog and Sitebulb to perform the same audits, showing how Sitebulb’s equivalent can make it easy to automate routine SEO tasks that would typically take hours to do manually.
Screaming Frog – Keyword Extraction
Firstly, I will talk about using custom extraction to find keywords on a website.
There are various reasons you might want to do this, finding articles about a particular topic or internal link opportunities, for example.
This is more reliable than using the ‘site search’ operator in Google, especially when you have lots of instances to track and look through.
For example, finding instances of keywords on non-indexed pages or avoiding duplicate instances – especially annoying when all your results link to the same ‘related post’.
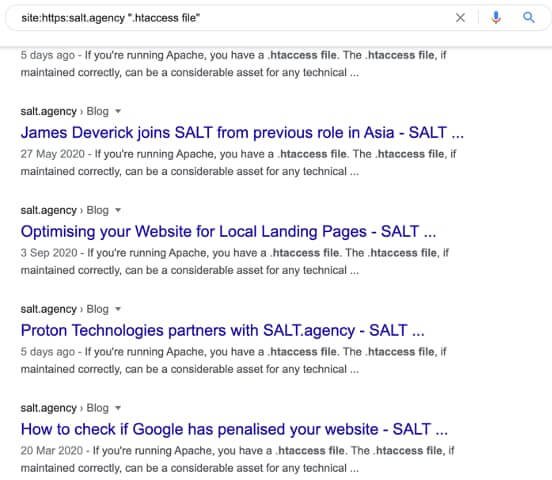
This is demonstrated in the screenshot below when I use Google site search operator to look for the query ‘.htaccess file’ within SALT’s own blog.
So, when it comes to keyword extraction, I usually focus on finding keywords within the main content. This means avoiding instances of keywords mentioned in headers and footer menus, title tags and the dreaded related posts.
Using XPath, you can write an expression to determine the exact location on a page to look.
In Google Chrome, this involves using the inspect element, selecting the location you wish to search and copying the XPath element.
Using this XPath method with Screaming Frog is relatively quick and easy for one-off searches.
With a bit of advanced knowledge, you can specify additional rules in your XPath expression, such as including/excluding capitalisation or specifying how many instances of the keywords you want to find per URL.
However, there are a couple of downsides to using XPath within Screaming Frog.
Specifying more advanced expressions can prove slightly tricky to master for XPath beginners and setting up multiple instances per crawl using the interface on Screaming Frog means you need to enter parameters many times.
However, the output of data to a CSV file is incredibly simple and generates easy-to-view data.
Screaming Frog – Extracting data other than keywords
Extracting content other than the keywords mentioned above is also possible.
For example, if you wanted to extract product SKU codes from an e-commerce store or extract a list of email addresses from a directory, you can just about use the same custom extraction feature.
All you need to do is change the XPath expression and ensure that it is updated to the correct page(s) location to find what you want.
Although this seems identical to the keyword extraction method I have just mentioned, I include it because of how Sitebulb helps extract different data – such as emails and numbers a bit differently later on in this post.
Screaming Frog – Counting instances of content
Another function that I have found useful is the ability to count how many pieces of content that are present under a category or tag.
For example, if I needed to find out how many pieces of content each member of the SALT team has published, I could do so by defining a custom extraction across my target pages.
For this, I need to crawl my target URLs and look for the element that specifies the author’s name in every post.
Because the author name is located within the same place; one extraction will find every instance and map it against the URL.
When the crawl has been completed, a list of the exported URLs with the exported author element will look like something below:

With a little bit of excel know-how, I can process the data to find out how many blog posts each team member has written.
Using Sitebulb as an alternative to Screaming Frog
In August ‘20, Sitebulb released v4.0 which included additional functionality – custom extraction. Not only does this let you output the same data as some of the Screaming Frog extractions I have demonstrated but also allows a user-friendly interface for SEOs.
Doing the same tasks I have just run through above for Screaming Frog, the new feature on Sitebulb makes this incredibly simple to do.
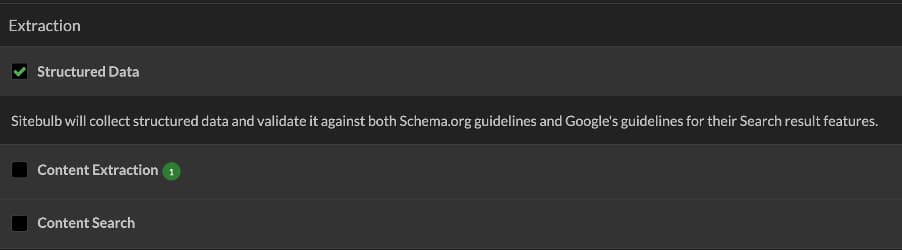
Once you have downloaded the new version, set up a new crawl as usual but scroll down to the ‘Extraction’ feature in your audit setup.
You can now view three different extraction features: structured data, custom extraction and content search.
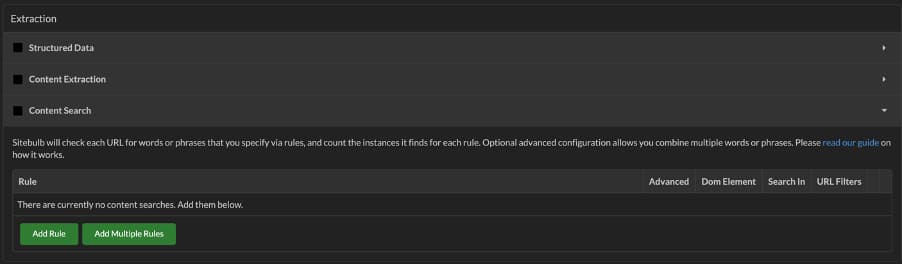
Content search in Sitebulb
For this first Screaming Frog example I used, I want to find keywords for internal link opportunities.
To do the same in Sitebulb, I need to expand the last row ‘Content Search’. This takes me to the following screen:
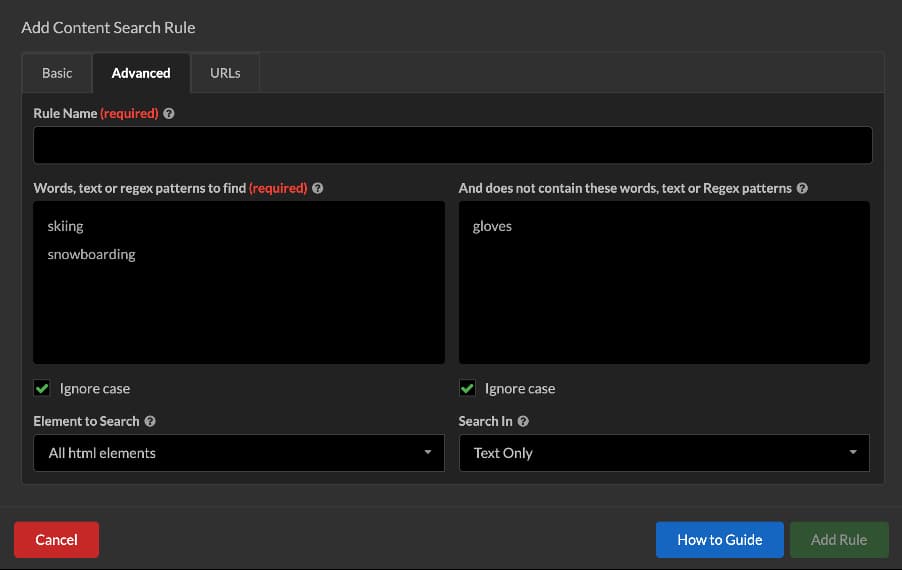
I have selected the ‘advanced’ tab, which is similar to the ‘basic’ tab, but also gives you the opportunity to add multiple words and exclude words at the same time.
Without any coding knowledge, you can search for multiple keywords with additional options.
You can select the element to search, which include:
- All html elements
- In the <head> element
- In the <body>
- In the <body> but not <a>
- A specific element
This allows me to include/exclude certain locations for finding keywords.
Another handy feature is the ‘ignore case’ checkbox. For example, a keyword may not include capitalisation by default, but if a sentence starts with the keyword, it will likely be capitalised.
You can also choose to search text-only elements, or text and HTML – which is useful for finding instances of the keyword within links.
Finally, in the URLs tab, you can select specific URLs to include/exclude as per your requirements.
Much like Screaming Frog, data is outputted via a CSV or Google Sheet of your choice.
Unlike Screaming Frog where all instances of the keywords are clearly exported, with Sitebulb, you will need to apply filters to sort the number of mentions of your target keyword(s) as well as manually search for where the keyword is mentioned on the page.
Exporting specific data with Sitebulb
When using Screaming Frog to export data using XPath, simply specify the location on the page to crawl, and it will be exported.
Sitebulb approaches this a bit differently, using the ‘content extraction’ feature to help users do this.
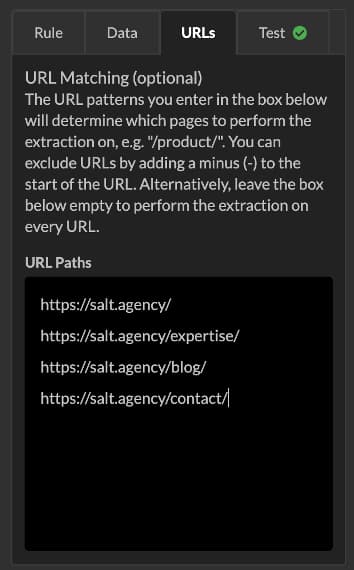
Open an example URL from the pages you wish to crawl. In this example, I have set the crawl to find all the publish dates for my blog posts on my author page URL.
Once I have loaded a preview of the page within Sitebulb, I can then click on any of my blog post publish dates which selects the CSS selector path. I set the extraction to find all instances on the page using the ‘data’ field, and make sure that the pre-crawl test outputs the data I want.
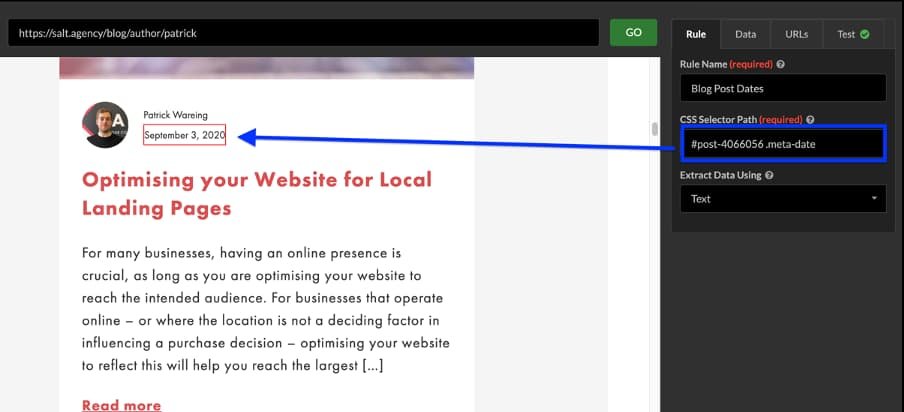
This extraction is incredibly useful and more flexible than the approach given by Screaming Frog. Not only do I get to preview the output of the extraction before I set the crawl running, but I can also specify which instances I want.
Again, the data is outputted in a simple CSV or Google Sheet for post-processing.
Counting content on Sitebulb
In my Screaming Frog equivalent for this extraction, I relied on crawling all URLs with an XPath selector to scrape the name for each individual blog post URL prefixed by https://salt.agency/blog/. I could then post-process the data to count how many instances occurred.
Doing the same with Sitebulb uses the same content extraction just discussed.
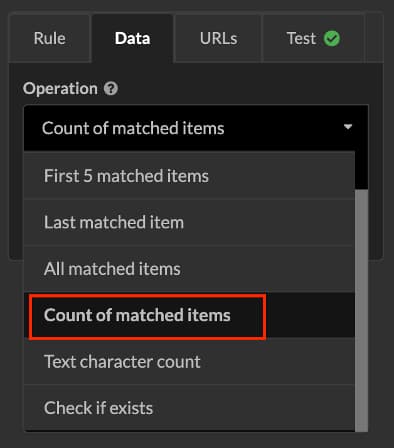
This time, however, I change the CSS Selector path by clicking on the loaded URL and update the rule name for my own reference.
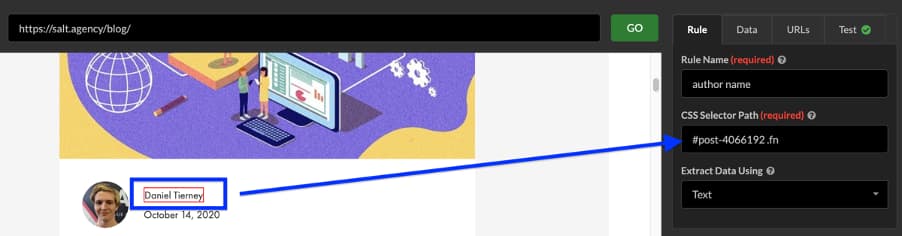
I then change the operation in the ‘data’ tab and then output the ‘count of matched items’ to specify the pieces of content I wish to count.
With this feature, you may want to make sure you specify all URLs to crawl, especially if pagination is present.
Bonus: Structured data extraction
The last thing I want to discuss as part of Sitebulb’s new custom extraction features is the structured data element.
Although you don’t need to use XPath or custom extraction in Screaming Frog to do this – it is included in the standard crawl results – Sitebulb now matches this functionality.
Unlike the content extraction and custom extraction, there are no parameters to set up; just select the tick box before starting your audit!
Sitebulb or Screaming Frog – Which is best?
Both of these tools are very similar in the functions they perform when it comes to site audits.
With the update to v4.0, Sitebulb has significantly matched their functionality to that of Screaming Frog.
For me, using XPath with Screaming Frog is a little tricky to get set up and get the exact data you wish to export.
If you are running multiple XPath queries at once, inputting multiple expressions at once is tricky and not the easiest.
However, once you get the data you require from a crawl, the exported data is incredibly useful to analyse and process.
Sitebulb, on the other hand, makes extraction of data incredibly easy for all users – especially those new to anything like this.
The live click and inspect feature, with the range of settings that you can specify means that you can do this without any knowledge of XPath or CSS.
Running a successful crawl, to generate the exported data can also take a bit of time to perfect as well as some post-processing to generate all the insights you need.
For me, there is no winner when it comes to custom extraction.
Both have their own pros and cons, but access to both tools increases versatility for specific custom extraction tasks.
Either way, both crawlers have great documentation, and you should definitely check them out before you give it a go for yourself!


